# Split Bill
The Split Bill feature simplifies the process of dividing a bill among multiple individuals, allowing each guest to conveniently pay their share. You can allocate specific payment amounts to each guest and send payment links via email to the intended recipients for easy payment before the event.
# Split Bill Insight
To access the Split Bill feature, an order must have an initial deposit paid with a remaining amount due.

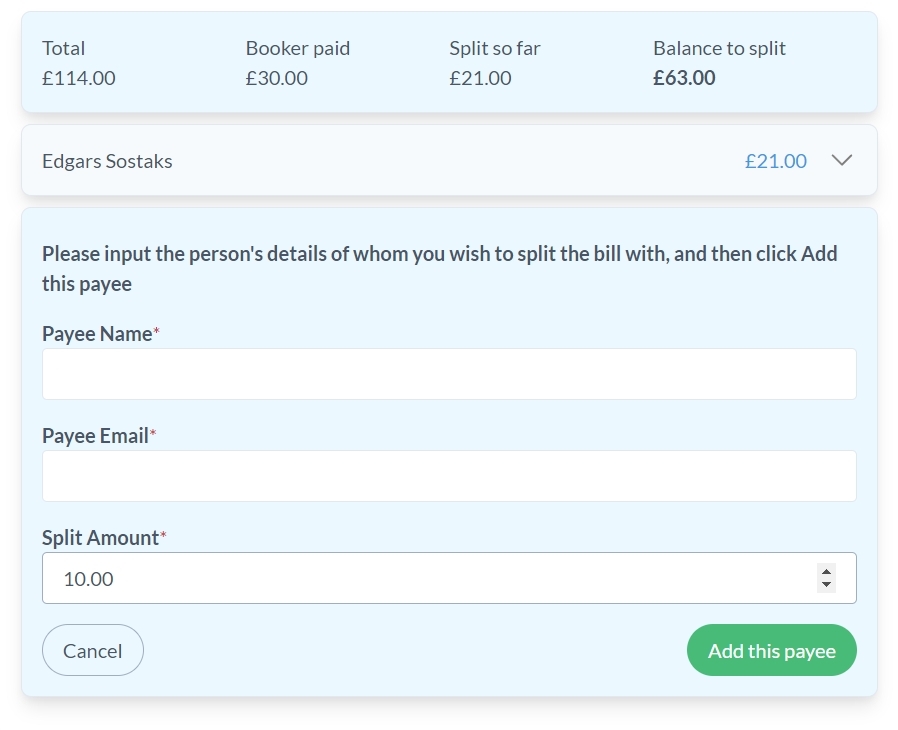
Upon clicking the Split Bill button, you will be prompted to add a payee. Selecting the 'Add Payee' option opens a form where you can input the recipient's details for splitting the bill. After entering all the necessary information, click 'Add this payee.'

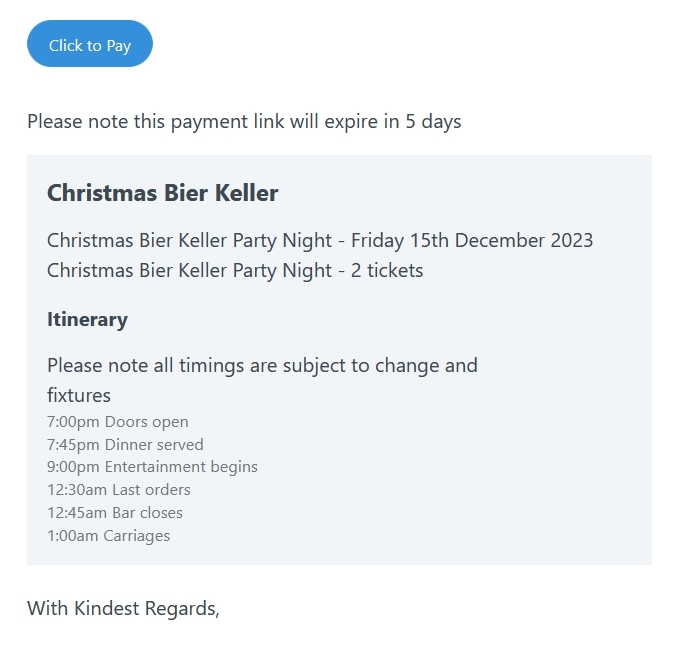
Clicking 'Start Email Process' in the next step allows you to choose the recipients of the email. The Event Booking Software enables you to add multiple payees, ensuring each individual pays their respective share. By clicking 'Send Payment Request Emails,' the email sending process begins, and recipients receive an email, as shown in the image below.

For ease of use, the link sent to the payee directs them straight to the Worldpay payment page, expediting the payment without the need for registration on the Event Booking site. Please note that the payment link has an expiration date for security purposes.
Upon revisiting the Split Bill screen, you can see all successful payments made by other guests highlighted in green, providing clarity on paid portions.
# Admin Setup
# Enabling Split Bill Feature
The Split Bill feature is activated at the event group level by navigating to the Set Up Menu > Event Groups and enabling the Split Bill option within the chosen event group. Ticking the Split Bill checkbox enables the display of the 'Split Bill' button on the client site.
# Review Payment changes
Payment updates can be tracked by accessing the Recent Orders > Display Orders screen. A comprehensive overview of all order transactions is available by clicking the 'History' button within the Display Orders screen.
# Email content
The email sent to the payee includes the following information:
Event Group Name - bold text like 'Christmas Bier Keller' in the image example above refers to the
Namefield of an event group, set in the Set Up Menu > Event Groups screen.Event Title - text like 'Christmas Bier Keller Party Night - Friday 15th December 2023' represents the
Event Titlefield of an event, set within the Set Up Menu > Event Group > Event screen.Ticket Name - for individual products serving as tickets, such as 'Christmas Bier Keller Party Night,' the ticket name is derived from the
Product Namefield, set on the Set Up Menu > Product Group > Product page.Itinerary Details - itinerary entries such as '7:45pm Dinner served' within the itinerary list, alongside the
Itinerary Narrativeare fields configured on the Events page.Email Signatory - customize email content and settings for a specific event using the Set Up Menu > Email Configuration page or establish a general signatory for all events through Set Up Menu > Email Defaults page.
← Edit Order My Profile →