# Add Orders
# Add Order (Order Header)
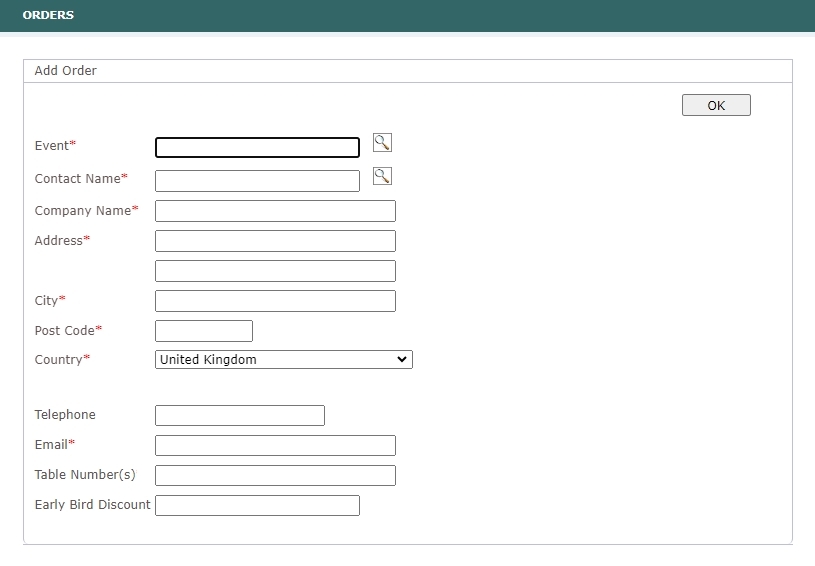
When you visit the Add Orders page, the Add Order header block is displayed first. This block contains key information about the customer and the event that the customer plans to attend. To create a new order, you need to have both an event and a customer set up.
TIP
Please follow this link to read more on how to add a new event.
Please follow this link to read more on how to add a new customer.
Rules for adding orders:
Mandatory fields for adding orders are: Event, Contact Name, Address Line 1, City, Telephone or Email.
- Choose an
Eventby clicking on theMagnifying Glassicon. You can either find the event in the pop-up while manually scrolling or through search facility on the upper right corner. Once you click on the chosen event, it will autofill the event name in theAdd Orderform and close the pop-up. - Choose a
Customerby clicking on theMagnifying Glassicon. You can either find the customer in the pop-up while manually scrolling or through search facility on the upper right corner. Once you click on the chosen customer, it will autofill the available customer details inAdd Orderform and close the pop-up.
TIP
If you couldn't find a customer, check again in Customers page. If you want to add a new customer, please follow these steps before creating a new order.
- If table number is known, you can input it in
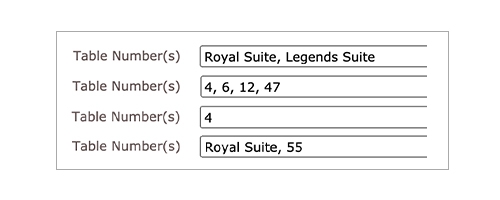
Table number(s)field.Table number(s)is an integer or text input, if inputting multiple, must be divided by comma. Table number input is of informative nature and will be shown onOrder Confirmationand Event Matrix.
- If applying a discount to the customer's order, fill the
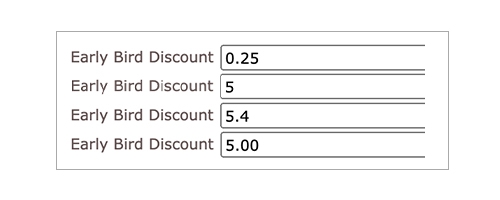
Early Bird Discountfield; it will be applied automatically to discountable products.Early Bird Discountis a percentage discount applied to discountable products in the order. Only products in product groups that allow for discounts will be affected. Integer or decimal number divided by full stop.are accepted inputs. The discount percentage will be automatically calculated and applied to discountable products after this screen.- If this input is cleared and saved for an existing order, the discount will no longer apply, and the customer will be expected to pay standard prices.
- If this input is changed and saved for an existing order, the discount will change to the new input, and the customer will be expected to pay new higher or lower prices.
- If the customer logs into their customer account and edits their product quantities, the discount will be retained and applied to the new quantities and products if discountable.
- Customer cannot add, edit or remove the discount.
TIP
Some events will require selecting a time interval in the Timeslot field if the event has specified time slots. Select the time slot manually when needed.
Click OK to continue to Product selection screen.
# Event Order (Product Selection)
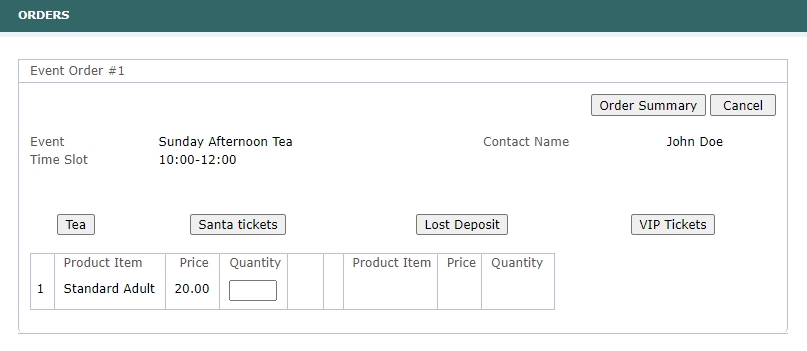
Product Selection screen contains only products marked for the chosen event. This screen allows only integer inputs for selected product items.
- The prices will be adjusted if an
Early Bird Discountwas specified at theOrder Headerstage. If no discount has been applied, the pricing will show the standard prices set in the event's tariff. - Navigate through the tabs to manually choose products and input quantities the customer has ordered. The expected input is an integer. The input fields vary depending on product types:
- For regular products, you can input quantities.
- For variable price products, you can enter a price as custom amount.
- For lost deposit products, the price is derived as the
Deposit Amountset in the event. - For lost place products, the price is derived from the tariffs.
WARNING
Price cannot be changed when validating the order. Always double check products and prices are correct before finalizing orders.
After completing the product selection, click Order Summary to proceed to the next screen. If the customer has changed their mind, you can click Cancel > Abandon Changes.
# Order Summary
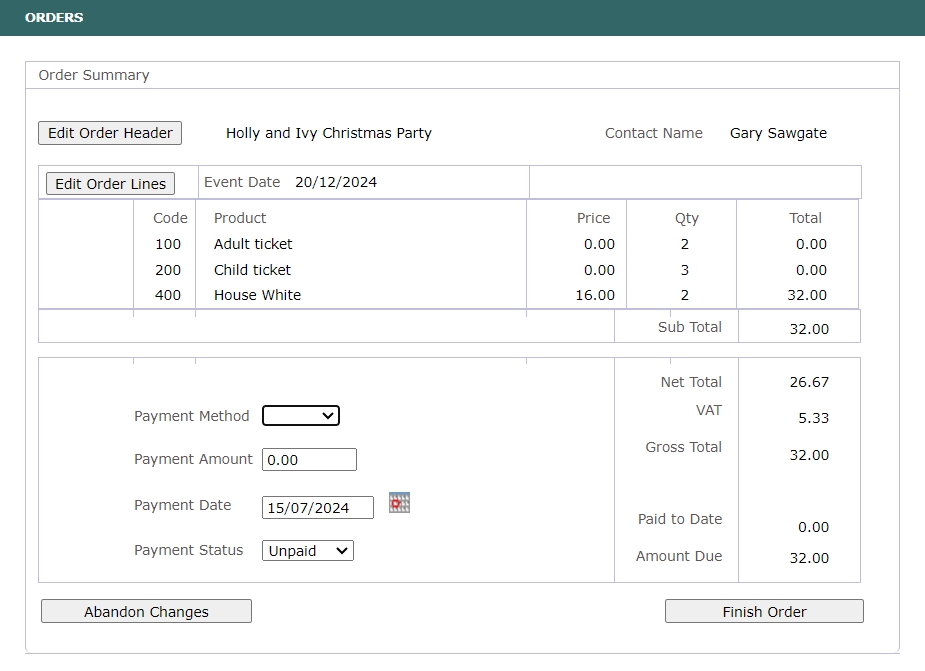
The Order Summary screen lists general payment details of the order and offers the following actions:
Payment (if received) can be added at this stage, and the summary on the right hand side will change based on your inputs.
Payment Methodwill be used onOrder Summary,Payment Historyand used when sending automatedPayment Reminderemails (if set up). The currently supported methods are: Bank Transfer (Bacs), Credit Card (C/Card),Cheque,Cash.Payment Amountexpects a decimal number. Negative numbers are not accepted.Payment Dateexpects the date in thedd/mm/yyyyformat. Alternatively, you can choose the correct date by clicking on the calendar icon.Payment Statuswill be auto-filled based on the amounts input, but you can specify the status manually.
Review the order summary to ensure the accuracy of product details, quantities, prices, the order total and:
If you are collecting payment, complete the payment method, amount, and date fields. After verifying the details, click
Finish Orderto save the order in the database. The customer can then view, edit, and make payment from their profile.If you are not collecting payment, click
Finish Order.This action will save the order in the database, allowing the customer to view, edit, and make payment from their profile as needed.If the customer has changed their mind and doesn't want to place the order, click
Abandon Changes.If the order has been saved before clickingAbandon Changes,it will discard the changes made during this edit. If the order has not been saved before clickingAbandon Changes,it will delete the order entirely.
Review the order summary to ensure the accuracy of product details, quantities, prices, and the order total. After verifying the details, click Finish Order to save the order in the database. The customer can then view, edit, and make payment from their profile. If the customer has changed their mind** and doesn't want to place the order, click Abandon Changes. If the order has been saved before clicking Abandon Changes, it will discard the changes made during this edit.
WARNING
This payment feature is not linked to WorldPay and does not update automatically. If a payment was not processed through this system (e.g., manually collected via a terminal or received by cheque), it has been manually entered.
IMPORTANT
Order changes are not saved if Finish Order button is not clicked. This button finalizes the process of adding and editing orders.
# Display Orders
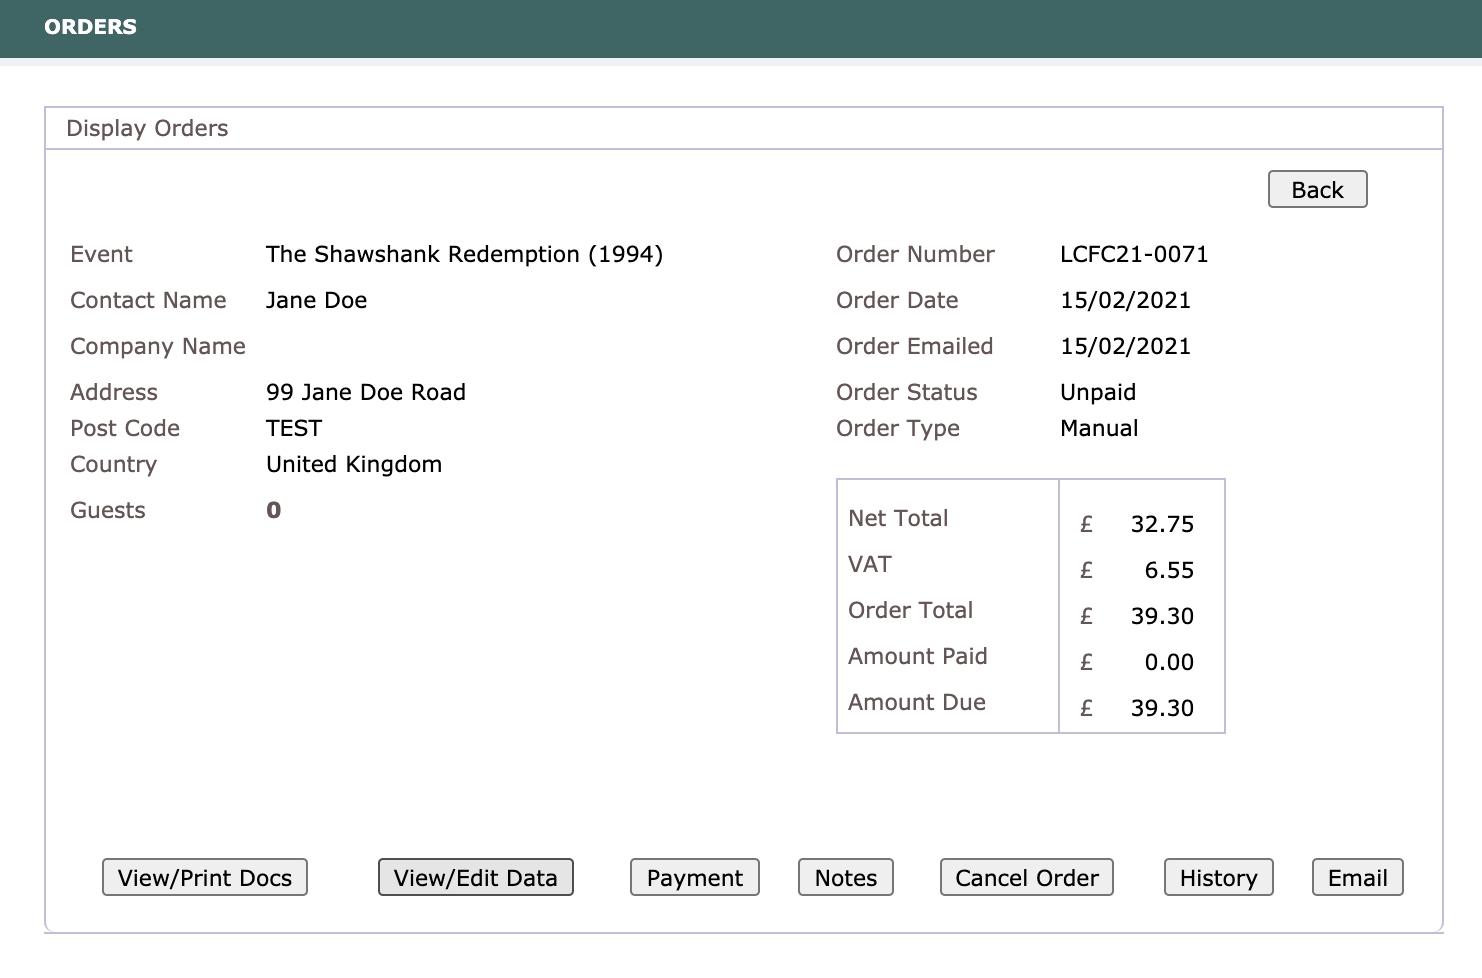
Once an order has been created, the Display Orders screen will display general order information and offer the following actions:
- Print the Invoice and Order Confirmation as a PDF file by clicking the
View/Print Docsbutton. View/Edit Dataallows to modify order information in more detail if needed.- Add
Notesrelated to the order. Cancel Orderif required.- View sequence of actions related to the order in the
Historyscreen. - Send
Emailorder confirmation to the customer, including an attached invoice. - If a payment has been made, you will also see a
Refundoption for the order. If the payment was partial, you will see the payment details under thePaymentoption.
# Print Docs
The View/Print Docs feature provides a convenient way to print invoices and order confirmations, complete with all the necessary invoice data for each order. If the order is cancelled, it will be marked as cancelled in red letters in the invoice.
# Edit Data
To make changes to an existing order, please follow these steps:
Navigate to the
Recent Orderspage and select the order you would like to edit.If you need to make changes to the associated event, time slots, customer information, table number, or discounts:
- Click on the
View/Edit Data > Edit Order Headerbuttons. - Make the necessary changes and click
OK. - If you don't need to adjust the products and quantities in the order, you can skip the next screen by clicking
Order Summary. - Click
Finish Orderto save the changes.
- Click on the
If you want to adjust the products and quantities in the order:
- Click on the
View/Edit Data > Edit Order Linesbuttons. - Adjust the products and quantities, then click on
Order Summary. - Review the order details.
- Click
Finish Orderto save the changes.
- Click on the
WARNING
Order changes are not saved if the Finish Order button is not clicked. This button finalizes the process of adding and editing orders.
# Payment
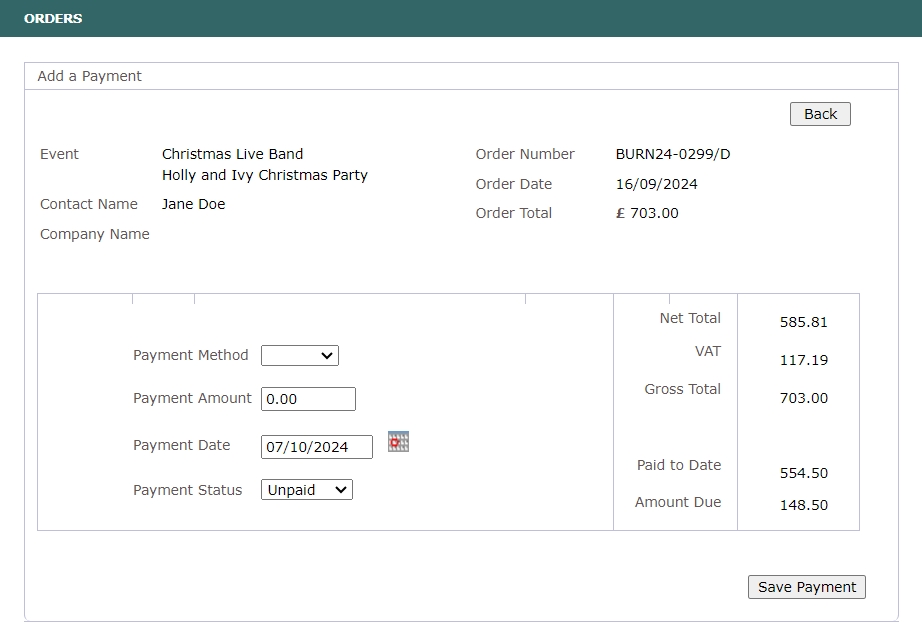
If received, payment can be added on the Payment screen:
Payment Methodwill be used onOrder Summary,Payment Historyand when sending automatedPayment Reminderemails, if they are set up. The currently supported methods are: Bank Transfer (Bacs), Credit Card (C/Card), andSertifi.Payment Amountexpects a decimal number. Negative numbers are not accepted.Payment Dateexpects the date in thedd/mm/yyyyformat. Alternatively, you can choose the correct date by clicking on the calendar icon.Payment Statuswill be auto-filled based on the amounts input, but you can specify the status manually.
# Refund
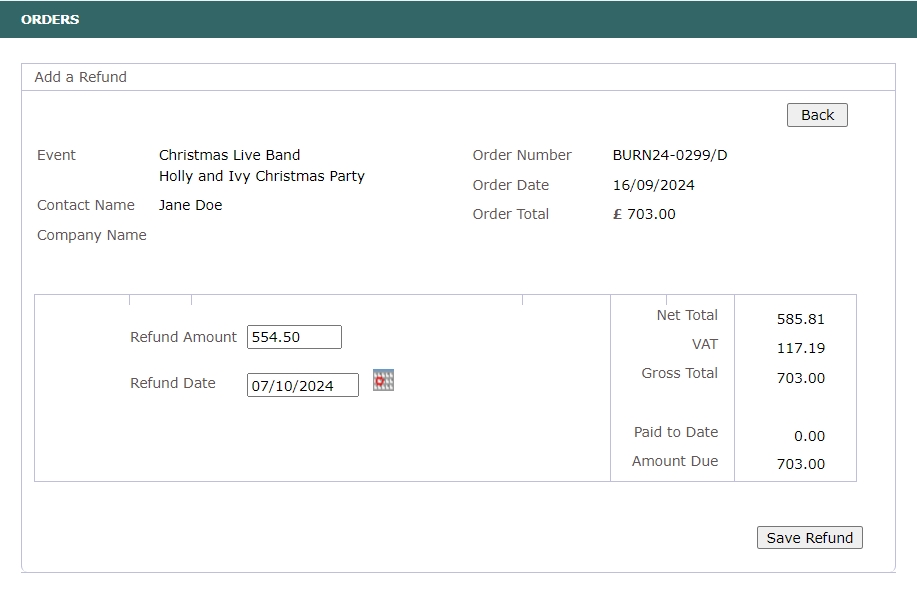
The Refund screen lists Paid to Date and Amount Due parameters, and allows you to manually log any refunds that are made outside of the Event Booking system.
# Cancel Order
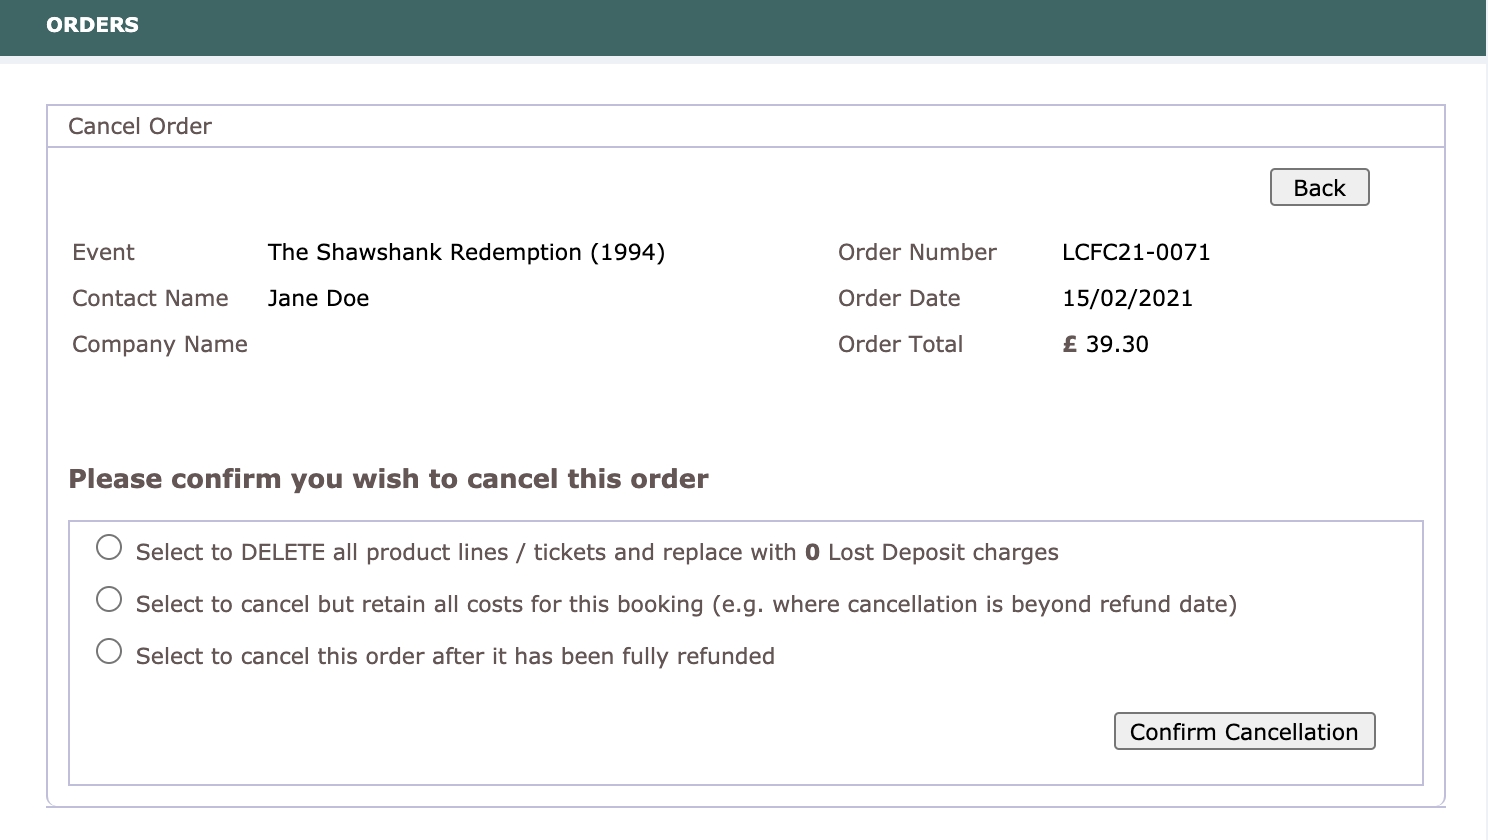
After selecting Cancel Order on the Display Orders screen, you can proceed to the Cancel Order screen. Here, you can choose actions like deleting all product lines, retaining costs for bookings beyond refund date, or canceling fully refunded orders. Clicking Confirm Cancellation will enact the selected cancellation option.
# Un-Cancel Order
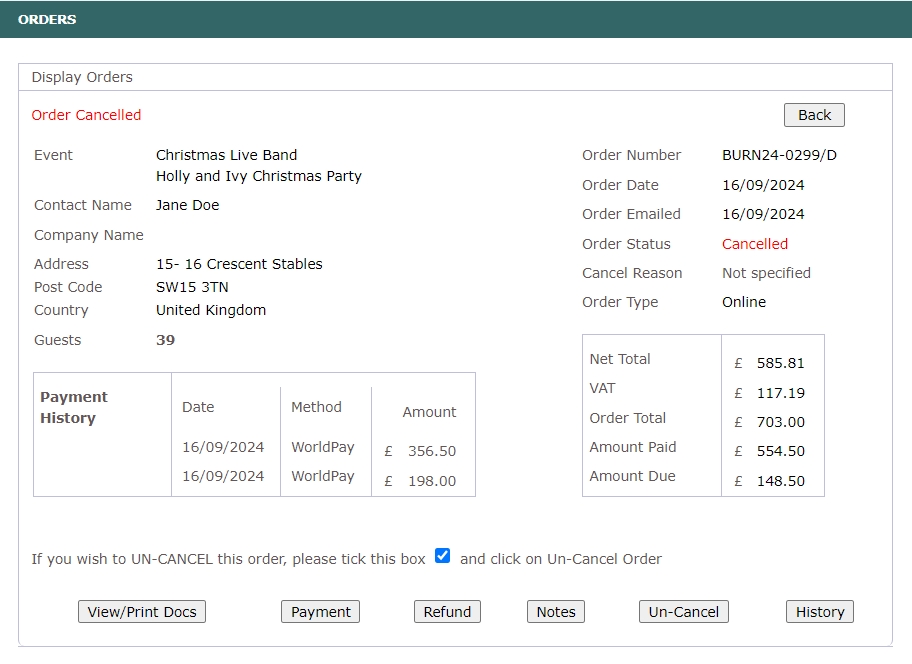
You can revert the cancellation of any previously canceled order. The option to un-cancel an order is accessible immediately after the Cancel Order screen. Alternatively, you can select a canceled order from the Main Menu > Cancelled Orders section.
TIP
Please tick the box, and then press Un-Cancel Order to restore the order.
# Notes

There are two types of notes:
Additional Info,also known asSpecial Requirements/Dietary RequirementsorCustomer Notes,appears on Event Matrix,Order Summary,andOrder Confirmation.For example, it may include information like "Allergic to peanuts" as seen on the Order Confirmation message below.

Audit History Noteis used for auditing purposes.
If necessary, you can provide dietary requirements in the Dietaries block. Here, you can specify details such as Nut Allergy and General dietary preferences. You can also modify or create new dietary requirements in Set Up Menu -> Dietaries Configuration.
# History
This screen provides the History Details, showing who, when and for what reason changed the order, including basic information from the Order Summary at the time of the change..
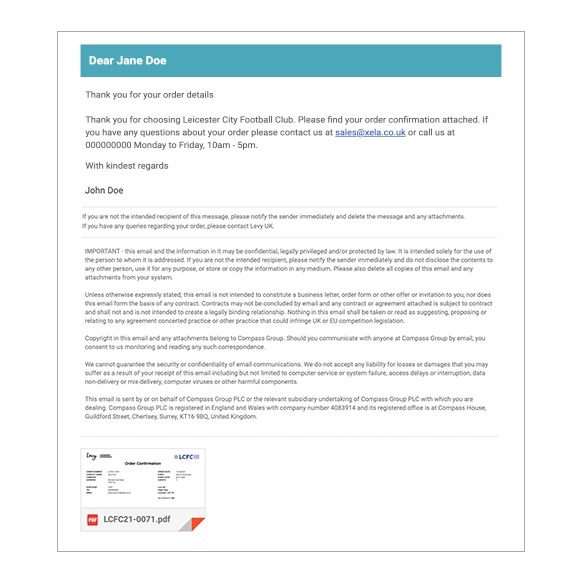
Once the order is complete, you can customise text to be sent to the customer by clicking on Email button on the Display Orders screen. Fill in the details and edit the text to tailor the message to your needs and click Email Order. All fields on this screen are used to create an email body that will be sent to the customer. The footer and formatting will be applied automatically.
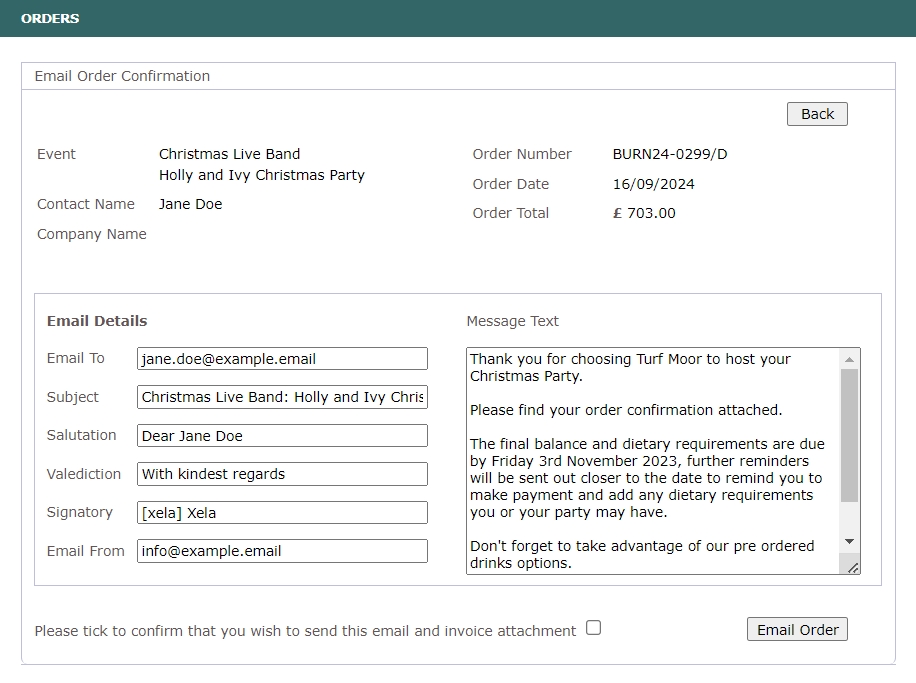
After confirming the sending order by ticking the checkbox, clicking the Email Order button will send an email confirmation of the order to the client. If selected, it will also include an attached PDF order summary for their records.
TIP
If a client chooses to pay by bank transfer, it can be done by creating a 'manual' order on the Add Orders page and then emailing out the invoice which will have the bank details for the transfer. You can click View/Print Docs button on Display Orders screen to view the invoice PDF file and save it to your PC. Then email it to your client as an attachment using your normal email client. Once the payment has arrived, you can click the Payment button on Display Orders screen to record it.
# Merge
The merge button appears conditionally when the same booker has multiple bookings for the same event. Once the merge is completed, it cannot be undone, making this action irreversible.
# The Merge Conditions:
- The same event.
- The same booker.
- The same discount applied.
- No Split Bill Records: If any orders have Split Bill records, then the merge option will not be available.
The current order you are working on is selected as the target order. The rest orders meeting requirements are source orders. When merging, the source order will be added to the target order with all relevant information. The source order will be deleted once all data is transferred, including products, dietaries, notes, and payments.
# Processing the Merge
If you confirm the merge:
- The system sums the payment amounts and deposits from all selected orders and adds them to the target order.
- It checks if each product from the source orders exists in the target order. If the product exists, its quantities and amounts are added to the target order.
- The system updates payment records, transferring them from the source orders to the target order.
- It merges dietary requirements from the source orders into the target order.
- The target order’s payment amounts, deposits, and notes are updated.
- A PDF summary of the merged order is generated, and its link is updated in the target order.
- The merge action is recorded in the order history.
After the merge is complete, detailed results of the merged data, including updated payment totals and product quantities, are displayed. The updated total amount for the target order will also be shown.